Mastering Sketch Grid Behavior in Fusion 360: Tips & Tricks

Mastering Sketch Grid Behavior in Fusion 360: Tips & Tricks

Introduction

Sketch Grid Behavior in Fusion 360 is a fundamental concept that can be overwhelming for beginners. However, understanding and mastering this feature can significantly improve your productivity and workflow in Fusion 360. In this blog post, we will delve into the world of sketch grids, exploring their behavior, settings, and practical applications.

Understanding Sketch Grids in Fusion 360

A sketch grid is a rectangular or square grid that serves as a reference plane for sketching and designing in Fusion 360. It is used to create accurate and precise sketches, especially when working with complex geometries. The sketch grid can be customized to meet specific design requirements, allowing users to create precise and professional-looking designs.

Creating a Sketch Grid

To create a sketch grid in Fusion 360, follow these steps:

  1. Open a new sketch or select an existing one.
  2. Go to the “Sketch” tab and click on the “Grid” icon.
  3. In the “Grid” dialog box, select the desired grid type (rectangular or square) and specify the grid spacing.
  4. Click “OK” to apply the grid settings.

Grid Behavior and Settings

Understanding the behavior and settings of the sketch grid is crucial for effective design. Here’s a breakdown of the key settings:

Grid Spacing

The grid spacing determines the distance between the grid lines. A smaller grid spacing results in a more precise grid, while a larger spacing provides a coarser grid.

Grid Origin

The grid origin is the point from which the grid is measured. By default, the grid origin is set to the origin point (0, 0, 0). However, users can move the grid origin to any point in the sketch.

Grid Snap

Grid snap refers to the ability of the sketch to snap to the grid lines. This feature is essential for creating accurate sketches. Users can adjust the grid snap settings to suit their design requirements.

Practical Applications of Sketch Grids

Sketch grids are a versatile tool in Fusion 360, offering numerous practical applications. Here are a few examples:

Creating Precision Sketches

Sketch grids are ideal for creating precise sketches, especially when working with complex geometries. By using a sketch grid, users can ensure accurate measurements and precise design.

Aligning Components

Sketch grids can be used to align components in a design. By creating a grid and snapping components to it, users can ensure accurate component placement.

Creating Arrays

Sketch grids can be used to create arrays of components. By creating a grid and snapping components to it, users can create complex designs with ease.

Advanced Sketch Grid Techniques

Mastering advanced sketch grid techniques can take your designs to the next level. Here are a few techniques to explore:

Using Multiple Grids

Users can create multiple grids in a single sketch, allowing for greater design flexibility. By using multiple grids, users can create complex designs with ease.

Creating Custom Grids

Users can create custom grids that meet specific design requirements. By creating custom grids, users can ensure accurate measurements and precise design.

Using Grids with Other Tools

Sketch grids can be used in conjunction with other Fusion 360 tools, such as the “Offset” and “Mirror” tools. By combining grids with other tools, users can create complex designs with ease.

Troubleshooting Common Issues

While sketch grids are a powerful tool in Fusion 360, they can be prone to common issues. Here are some troubleshooting tips:

Grid Disappearing

If the grid disappears or becomes unresponsive, try resetting the grid settings or restarting the sketch.

Grid Lines Not Snapping

If grid lines are not snapping to the correct location, try adjusting the grid snap settings or using the “Grid” dialog box to fine-tune the grid settings.

Grid Origin Issues

If the grid origin is not behaving as expected, try moving the grid origin to a new location or resetting the grid settings.

Conclusion

Understanding sketch grid behavior in Fusion 360 is a fundamental concept that can significantly improve your productivity and workflow. By mastering this feature, you can create precise and professional-looking designs with ease. Remember to experiment with different grid settings and techniques to find what works best for you.

FAQ

Q: How do I reset the sketch grid settings?

A: To reset the sketch grid settings, go to the “Sketch” tab and click on the “Grid” icon. In the “Grid” dialog box, click on the “Reset” button.

Q: How do I create a custom grid in Fusion 360?

A: To create a custom grid in Fusion 360, go to the “Sketch” tab and click on the “Grid” icon. In the “Grid” dialog box, select the “Custom” grid type and specify the desired grid settings.

Q: How do I align components using the sketch grid?

A: To align components using the sketch grid, go to the “Sketch” tab and click on the “Grid” icon. In the “Grid” dialog box, select the desired grid type and specify the grid spacing. Then, snap the component to the grid lines using the “Snap” tool.

Q: Can I use multiple grids in a single sketch?

A: Yes, you can use multiple grids in a single sketch. To create multiple grids, go to the “Sketch” tab and click on the “Grid” icon. In the “Grid” dialog box, select the “Multiple” grid type and specify the desired grid settings for each grid.

Q: How do I troubleshoot common issues with the sketch grid?

A: To troubleshoot common issues with the sketch grid, try resetting the grid settings, adjusting the grid snap settings, or using the “Grid” dialog box to fine-tune the grid settings.

Q: Can I use the sketch grid with other Fusion 360 tools?

A: Yes, you can use the sketch grid with other Fusion 360 tools, such as the “Offset” and “Mirror” tools. By combining grids with other tools, you can create complex designs with ease.

Q: How do I move the grid origin to a new location?

A: To move the grid origin to a new location, go to the “Sketch” tab and click on the “Grid” icon. In the “Grid” dialog box, select the desired grid type and specify the grid spacing. Then, click on the “Origin” button and move the grid origin to the new location.


End of Blog


Fusion 360 Workbook Cover

After purchasing, a download link will be sent instantly to your email.

Buy Now For $27.99

Are you a student or Unemployed? Get this bundle for $19.99

Offer for Students Buy Now For $19.99

Buy Paperback on Amazon.com

Autodesk Fusion 360 All-in-One Workbook

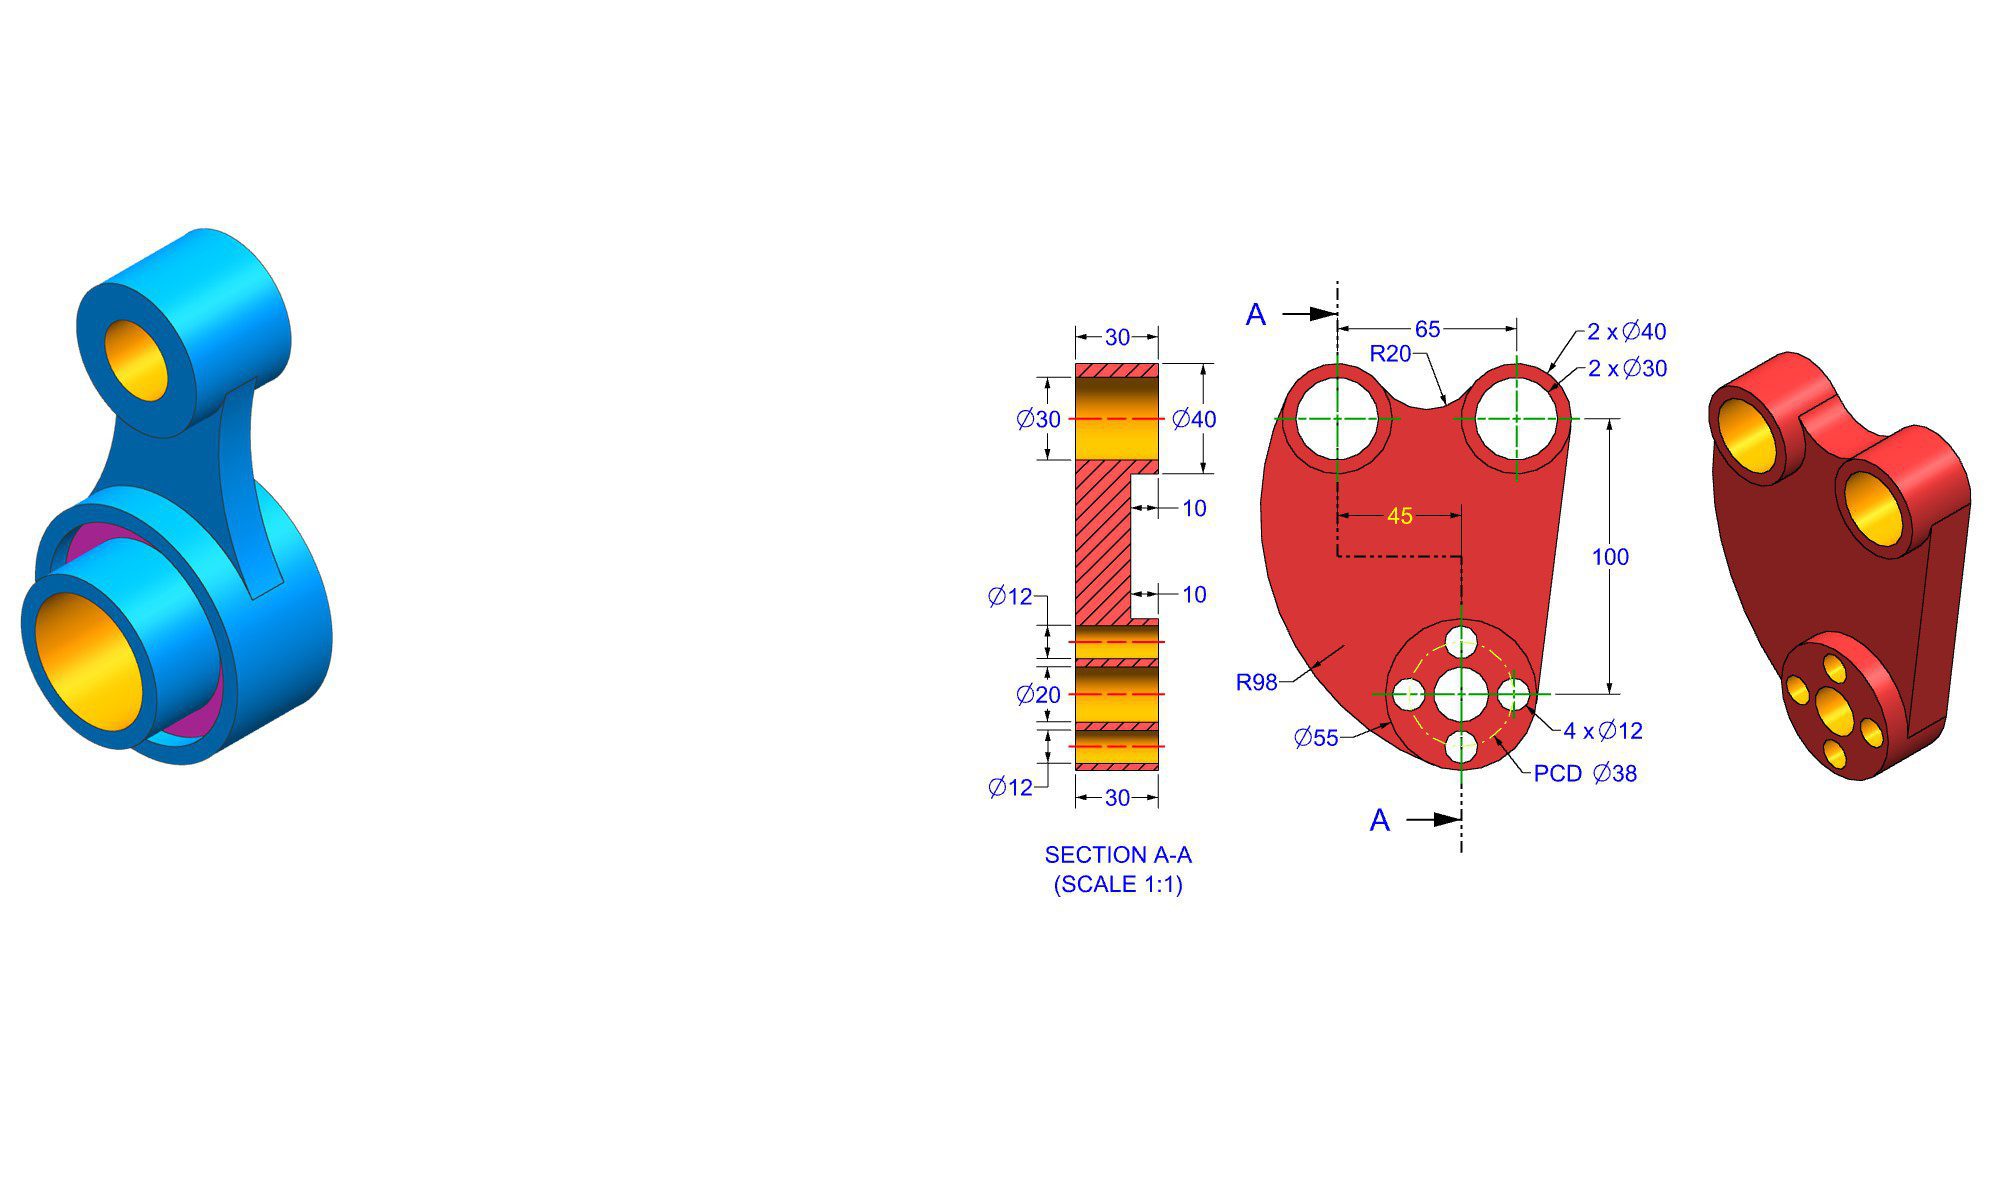
500+ Practice Exercises to Master Autodesk Fusion 360 through real-world practice!

This all-in-one workbook is your ultimate resource to develop hands-on CAD skills with Autodesk Fusion 360. Whether you’re a student, engineer, hobbyist, or professional, this guide is built to help you gain real design confidence through structured practice.

What’s Inside this Book:

  • 200 2D Sketching Exercises – Build a strong foundation in dimension-driven 2D geometry and technical drawings
  • 200 3D Modeling Exercises – Practice modeling real-world parts, from simple shapes to complex components.
  • Multi-Part Assembly Projects – Understand how parts fit together and create full assemblies with detailed drawings

🎯 Why This Book?

  • 500+ practice exercises following real design standards
  • Designed for self-paced learning & independent practice
  • Perfect for classrooms, technical interview preparation, and personal projects
  • Covers 2D Sketching, 3D Modeling & Assembly Design in one workbook
  • Trusted by 15,000+ CAD learners worldwide
After purchasing, a download link will be sent instantly to your email.

Buy Now For $27.99

Are you a student or Unemployed? Get this bundle for $19.99

Offer for Students Buy Now For $19.99

Buy Paperback on Amazon.com

Drawing Faces from Scratch in Fusion 360: A Step-by-Step Guide

Drawing Faces from Scratch in Fusion 360: A Step-by-Step Guide

Introduction

Fusion 360, a powerful computer-aided design (CAD) software, offers a wide range of tools to create detailed 3D models. One of the essential tasks in 3D modeling is creating a sketch on a face, which serves as the foundation for more complex designs. In this blog post, we will guide you through the step-by-step process of starting a sketch on a face in Fusion 360.

Setting Up the Sketch Environment

Before creating a sketch, it’s essential to understand the basic concepts of Fusion 360’s sketching environment. Familiarize yourself with the different tools and settings that will be used throughout this tutorial.

  1. Launch Fusion 360: Open Fusion 360 on your computer and create a new part or open an existing one.
  2. Enter Sketch Mode: Click on the “Sketch” tab in the top navigation bar to enter the sketching environment.
  3. Select a Face: Click on the face where you want to create the sketch. You can also use the “Select Face” tool (hotkey: F) to select the face.

Creating a New Sketch

Now that you have set up the sketch environment, it’s time to create a new sketch on the selected face.

Step 1: Create a New Sketch

  1. Create a New Sketch: Click on the “Create Sketch” button in the “Sketch” tab.
  2. Select the Face: Make sure the face you selected earlier is still highlighted.
  3. Choose a Sketch Type: Fusion 360 offers two types of sketches: “2D Sketch” and “3D Sketch.” For this tutorial, we will use the “2D Sketch” option.

Step 2: Define the Sketch Plane

The sketch plane is the 2D plane where you will create your sketch. You can define the sketch plane manually or let Fusion 360 automatically detect it.

  1. Define the Sketch Plane: Click on the “Define Sketch Plane” button.
  2. Select a Reference: Choose a reference point on the face to define the sketch plane.

Adding Entities to the Sketch

Now that you have created a new sketch, it’s time to add entities to it.

Step 1: Add a Point

  1. Create a Point: Click on the “Point” tool (hotkey: P) and click on the face to create a point.
  2. Verify the Point: Make sure the point is created on the face and is not intersecting with any other entities.

Step 2: Add a Line

  1. Create a Line: Click on the “Line” tool (hotkey: L) and click on two points to create a line.
  2. Verify the Line: Make sure the line is created on the face and is not intersecting with any other entities.

Modifying the Sketch Entities

As you add more entities to the sketch, you may need to modify them to achieve the desired result.

Step 1: Move an Entity

  1. Select an Entity: Click on the entity you want to move.
  2. Move the Entity: Click on the “Move” tool (hotkey: M) and drag the entity to its new location.

Step 2: Rotate an Entity

  1. Select an Entity: Click on the entity you want to rotate.
  2. Rotate the Entity: Click on the “Rotate” tool (hotkey: R) and drag the entity to its new orientation.

Conclusion

Creating a sketch on a face in Fusion 360 is a fundamental skill that requires practice and patience. By following the steps outlined in this tutorial, you should now be able to create a sketch on a face and add entities to it. Remember to experiment with different tools and settings to achieve the desired result.

FAQ

Q: What is the difference between a 2D sketch and a 3D sketch in Fusion 360?

A: A 2D sketch is a 2D plane where you can create 2D entities, while a 3D sketch is a 3D space where you can create 3D entities.

Q: How do I select a face in Fusion 360?

A: You can select a face by clicking on it or using the “Select Face” tool (hotkey: F).

Q: What is the purpose of defining a sketch plane in Fusion 360?

A: Defining a sketch plane sets the 2D plane where you will create your sketch.

Q: Can I modify a sketch entity after it’s created?

A: Yes, you can modify a sketch entity by using the “Move,” “Rotate,” or “Scale” tools.

Q: How do I save a sketch in Fusion 360?

A: You can save a sketch by clicking on the “File” menu and selecting “Save As.”

Q: Can I reuse a sketch in another part or assembly in Fusion 360?

A: Yes, you can reuse a sketch by copying and pasting it into another part or assembly.

Q: What is the difference between a sketch and a feature in Fusion 360?

A: A sketch is a 2D or 3D plane where you create entities, while a feature is a 3D entity that is created from a sketch.


End of Blog


Fusion 360 Workbook Cover

After purchasing, a download link will be sent instantly to your email.

Buy Now For $27.99

Are you a student or Unemployed? Get this bundle for $19.99

Offer for Students Buy Now For $19.99

Buy Paperback on Amazon.com

Autodesk Fusion 360 All-in-One Workbook

500+ Practice Exercises to Master Autodesk Fusion 360 through real-world practice!

This all-in-one workbook is your ultimate resource to develop hands-on CAD skills with Autodesk Fusion 360. Whether you’re a student, engineer, hobbyist, or professional, this guide is built to help you gain real design confidence through structured practice.

What’s Inside this Book:

  • 200 2D Sketching Exercises – Build a strong foundation in dimension-driven 2D geometry and technical drawings
  • 200 3D Modeling Exercises – Practice modeling real-world parts, from simple shapes to complex components.
  • Multi-Part Assembly Projects – Understand how parts fit together and create full assemblies with detailed drawings

🎯 Why This Book?

  • 500+ practice exercises following real design standards
  • Designed for self-paced learning & independent practice
  • Perfect for classrooms, technical interview preparation, and personal projects
  • Covers 2D Sketching, 3D Modeling & Assembly Design in one workbook
  • Trusted by 15,000+ CAD learners worldwide

After purchasing, a download link will be sent instantly to your email.

Buy Now For $27.99

Are you a student or Unemployed? Get this bundle for $19.99

Offer for Students Buy Now For $19.99

Buy Paperback on Amazon.com

Drawing Faces from Scratch in Fusion 360: A Step-by-Step Guide

Drawing Faces from Scratch in Fusion 360: A Step-by-Step Guide

Introduction

Fusion 360, a powerful computer-aided design (CAD) software, offers a wide range of tools to create detailed 3D models. One of the essential tasks in 3D modeling is creating a sketch on a face, which serves as the foundation for more complex designs. In this blog post, we will guide you through the step-by-step process of starting a sketch on a face in Fusion 360.

Setting Up the Sketch Environment

Before creating a sketch, it’s essential to understand the basic concepts of Fusion 360’s sketching environment. Familiarize yourself with the different tools and settings that will be used throughout this tutorial.

  1. Launch Fusion 360: Open Fusion 360 on your computer and create a new part or open an existing one.
  2. Enter Sketch Mode: Click on the “Sketch” tab in the top navigation bar to enter the sketching environment.
  3. Select a Face: Click on the face where you want to create the sketch. You can also use the “Select Face” tool (hotkey: F) to select the face.

Creating a New Sketch

Now that you have set up the sketch environment, it’s time to create a new sketch on the selected face.

Step 1: Create a New Sketch

  1. Create a New Sketch: Click on the “Create Sketch” button in the “Sketch” tab.
  2. Select the Face: Make sure the face you selected earlier is still highlighted.
  3. Choose a Sketch Type: Fusion 360 offers two types of sketches: “2D Sketch” and “3D Sketch.” For this tutorial, we will use the “2D Sketch” option.

Step 2: Define the Sketch Plane

The sketch plane is the 2D plane where you will create your sketch. You can define the sketch plane manually or let Fusion 360 automatically detect it.

  1. Define the Sketch Plane: Click on the “Define Sketch Plane” button.
  2. Select a Reference: Choose a reference point on the face to define the sketch plane.

Adding Entities to the Sketch

Now that you have created a new sketch, it’s time to add entities to it.

Step 1: Add a Point

  1. Create a Point: Click on the “Point” tool (hotkey: P) and click on the face to create a point.
  2. Verify the Point: Make sure the point is created on the face and is not intersecting with any other entities.

Step 2: Add a Line

  1. Create a Line: Click on the “Line” tool (hotkey: L) and click on two points to create a line.
  2. Verify the Line: Make sure the line is created on the face and is not intersecting with any other entities.

Modifying the Sketch Entities

As you add more entities to the sketch, you may need to modify them to achieve the desired result.

Step 1: Move an Entity

  1. Select an Entity: Click on the entity you want to move.
  2. Move the Entity: Click on the “Move” tool (hotkey: M) and drag the entity to its new location.

Step 2: Rotate an Entity

  1. Select an Entity: Click on the entity you want to rotate.
  2. Rotate the Entity: Click on the “Rotate” tool (hotkey: R) and drag the entity to its new orientation.

Conclusion

Creating a sketch on a face in Fusion 360 is a fundamental skill that requires practice and patience. By following the steps outlined in this tutorial, you should now be able to create a sketch on a face and add entities to it. Remember to experiment with different tools and settings to achieve the desired result.

FAQ

Q: What is the difference between a 2D sketch and a 3D sketch in Fusion 360?

A: A 2D sketch is a 2D plane where you can create 2D entities, while a 3D sketch is a 3D space where you can create 3D entities.

Q: How do I select a face in Fusion 360?

A: You can select a face by clicking on it or using the “Select Face” tool (hotkey: F).

Q: What is the purpose of defining a sketch plane in Fusion 360?

A: Defining a sketch plane sets the 2D plane where you will create your sketch.

Q: Can I modify a sketch entity after it’s created?

A: Yes, you can modify a sketch entity by using the “Move,” “Rotate,” or “Scale” tools.

Q: How do I save a sketch in Fusion 360?

A: You can save a sketch by clicking on the “File” menu and selecting “Save As.”

Q: Can I reuse a sketch in another part or assembly in Fusion 360?

A: Yes, you can reuse a sketch by copying and pasting it into another part or assembly.

Q: What is the difference between a sketch and a feature in Fusion 360?

A: A sketch is a 2D or 3D plane where you create entities, while a feature is a 3D entity that is created from a sketch.


End of Blog


Fusion 360 Workbook Cover

After purchasing, a download link will be sent instantly to your email.

Buy Now For $27.99

Are you a student or Unemployed? Get this bundle for $19.99

Offer for Students Buy Now For $19.99

Buy Paperback on Amazon.com

Autodesk Fusion 360 All-in-One Workbook

500+ Practice Exercises to Master Autodesk Fusion 360 through real-world practice!

This all-in-one workbook is your ultimate resource to develop hands-on CAD skills with Autodesk Fusion 360. Whether you’re a student, engineer, hobbyist, or professional, this guide is built to help you gain real design confidence through structured practice.

What’s Inside this Book:

  • 200 2D Sketching Exercises – Build a strong foundation in dimension-driven 2D geometry and technical drawings
  • 200 3D Modeling Exercises – Practice modeling real-world parts, from simple shapes to complex components.
  • Multi-Part Assembly Projects – Understand how parts fit together and create full assemblies with detailed drawings

🎯 Why This Book?

  • 500+ practice exercises following real design standards
  • Designed for self-paced learning & independent practice
  • Perfect for classrooms, technical interview preparation, and personal projects
  • Covers 2D Sketching, 3D Modeling & Assembly Design in one workbook
  • Trusted by 15,000+ CAD learners worldwide

After purchasing, a download link will be sent instantly to your email.

Buy Now For $27.99

Are you a student or Unemployed? Get this bundle for $19.99

Offer for Students Buy Now For $19.99

Buy Paperback on Amazon.com

Drawing Faces from Scratch in Fusion 360: A Step-by-Step Guide

Drawing Faces from Scratch in Fusion 360: A Step-by-Step Guide

Introduction

Fusion 360, a powerful computer-aided design (CAD) software, offers a wide range of tools to create detailed 3D models. One of the essential tasks in 3D modeling is creating a sketch on a face, which serves as the foundation for more complex designs. In this blog post, we will guide you through the step-by-step process of starting a sketch on a face in Fusion 360.

Setting Up the Sketch Environment

Before creating a sketch, it’s essential to understand the basic concepts of Fusion 360’s sketching environment. Familiarize yourself with the different tools and settings that will be used throughout this tutorial.

  1. Launch Fusion 360: Open Fusion 360 on your computer and create a new part or open an existing one.
  2. Enter Sketch Mode: Click on the “Sketch” tab in the top navigation bar to enter the sketching environment.
  3. Select a Face: Click on the face where you want to create the sketch. You can also use the “Select Face” tool (hotkey: F) to select the face.

Creating a New Sketch

Now that you have set up the sketch environment, it’s time to create a new sketch on the selected face.

Step 1: Create a New Sketch

  1. Create a New Sketch: Click on the “Create Sketch” button in the “Sketch” tab.
  2. Select the Face: Make sure the face you selected earlier is still highlighted.
  3. Choose a Sketch Type: Fusion 360 offers two types of sketches: “2D Sketch” and “3D Sketch.” For this tutorial, we will use the “2D Sketch” option.

Step 2: Define the Sketch Plane

The sketch plane is the 2D plane where you will create your sketch. You can define the sketch plane manually or let Fusion 360 automatically detect it.

  1. Define the Sketch Plane: Click on the “Define Sketch Plane” button.
  2. Select a Reference: Choose a reference point on the face to define the sketch plane.

Adding Entities to the Sketch

Now that you have created a new sketch, it’s time to add entities to it.

Step 1: Add a Point

  1. Create a Point: Click on the “Point” tool (hotkey: P) and click on the face to create a point.
  2. Verify the Point: Make sure the point is created on the face and is not intersecting with any other entities.

Step 2: Add a Line

  1. Create a Line: Click on the “Line” tool (hotkey: L) and click on two points to create a line.
  2. Verify the Line: Make sure the line is created on the face and is not intersecting with any other entities.

Modifying the Sketch Entities

As you add more entities to the sketch, you may need to modify them to achieve the desired result.

Step 1: Move an Entity

  1. Select an Entity: Click on the entity you want to move.
  2. Move the Entity: Click on the “Move” tool (hotkey: M) and drag the entity to its new location.

Step 2: Rotate an Entity

  1. Select an Entity: Click on the entity you want to rotate.
  2. Rotate the Entity: Click on the “Rotate” tool (hotkey: R) and drag the entity to its new orientation.

Conclusion

Creating a sketch on a face in Fusion 360 is a fundamental skill that requires practice and patience. By following the steps outlined in this tutorial, you should now be able to create a sketch on a face and add entities to it. Remember to experiment with different tools and settings to achieve the desired result.

FAQ

Q: What is the difference between a 2D sketch and a 3D sketch in Fusion 360?

A: A 2D sketch is a 2D plane where you can create 2D entities, while a 3D sketch is a 3D space where you can create 3D entities.

Q: How do I select a face in Fusion 360?

A: You can select a face by clicking on it or using the “Select Face” tool (hotkey: F).

Q: What is the purpose of defining a sketch plane in Fusion 360?

A: Defining a sketch plane sets the 2D plane where you will create your sketch.

Q: Can I modify a sketch entity after it’s created?

A: Yes, you can modify a sketch entity by using the “Move,” “Rotate,” or “Scale” tools.

Q: How do I save a sketch in Fusion 360?

A: You can save a sketch by clicking on the “File” menu and selecting “Save As.”

Q: Can I reuse a sketch in another part or assembly in Fusion 360?

A: Yes, you can reuse a sketch by copying and pasting it into another part or assembly.

Q: What is the difference between a sketch and a feature in Fusion 360?

A: A sketch is a 2D or 3D plane where you create entities, while a feature is a 3D entity that is created from a sketch.


End of Blog


Fusion 360 Workbook Cover

After purchasing, a download link will be sent instantly to your email.

Buy Now For $27.99

Are you a student or Unemployed? Get this bundle for $19.99

Offer for Students Buy Now For $19.99

Buy Paperback on Amazon.com

Autodesk Fusion 360 All-in-One Workbook

500+ Practice Exercises to Master Autodesk Fusion 360 through real-world practice!

This all-in-one workbook is your ultimate resource to develop hands-on CAD skills with Autodesk Fusion 360. Whether you’re a student, engineer, hobbyist, or professional, this guide is built to help you gain real design confidence through structured practice.

What’s Inside this Book:

  • 200 2D Sketching Exercises – Build a strong foundation in dimension-driven 2D geometry and technical drawings
  • 200 3D Modeling Exercises – Practice modeling real-world parts, from simple shapes to complex components.
  • Multi-Part Assembly Projects – Understand how parts fit together and create full assemblies with detailed drawings

🎯 Why This Book?

  • 500+ practice exercises following real design standards
  • Designed for self-paced learning & independent practice
  • Perfect for classrooms, technical interview preparation, and personal projects
  • Covers 2D Sketching, 3D Modeling & Assembly Design in one workbook
  • Trusted by 15,000+ CAD learners worldwide
After purchasing, a download link will be sent instantly to your email.

Buy Now For $27.99

Are you a student or Unemployed? Get this bundle for $19.99

Offer for Students Buy Now For $19.99

Buy Paperback on Amazon.com

Master Fusion 360: Unlocking XY, XZ & YZ Plane Sketching Secrets

Master Fusion 360: Unlocking XY, XZ & YZ Plane Sketching Secrets

Introduction

In Fusion 360, sketching is an essential skill for creating 2D profiles, 3D models, and assemblies. Understanding the different planes in Fusion 360 is crucial for creating accurate and efficient sketches. The X-Y, X-Z, and Y-Z planes are three fundamental planes that serve as the foundation for sketching in Fusion 360. In this article, we will explore the differences between these three planes and provide practical examples to help you master sketching in Fusion 360.

Understanding the X-Y Plane

The X-Y plane is one of the three primary planes in Fusion 360. It is the default plane when creating a new sketch, and it serves as the base plane for most sketches. The X-Y plane is defined by the X-axis and Y-axis, which are perpendicular to each other. When sketching in the X-Y plane, you can create profiles that have a width and depth, but no height.

Creating a Rectangular Profile in the X-Y Plane

To create a rectangular profile in the X-Y plane, follow these steps:

  1. Open a new sketch in Fusion 360.
  2. Click on the “Sketch” tab and select the “Rectangular” tool from the 2D sketching tools.
  3. Draw a rectangle by specifying the width and depth of the profile.
  4. The resulting rectangle will be a profile with a width and depth, but no height.

Understanding the X-Z Plane

The X-Z plane is another fundamental plane in Fusion 360. It is defined by the X-axis and Z-axis, which are perpendicular to each other. When sketching in the X-Z plane, you can create profiles that have a depth and height, but no width.

Creating a Circular Profile in the X-Z Plane

To create a circular profile in the X-Z plane, follow these steps:

  1. Open a new sketch in Fusion 360.
  2. Click on the “Sketch” tab and select the “Circle” tool from the 2D sketching tools.
  3. Draw a circle by specifying the radius of the profile.
  4. The resulting circle will be a profile with a depth and height, but no width.

Understanding the Y-Z Plane

The Y-Z plane is the third fundamental plane in Fusion 360. It is defined by the Y-axis and Z-axis, which are perpendicular to each other. When sketching in the Y-Z plane, you can create profiles that have a height and width, but no depth.

Creating a Trapezoidal Profile in the Y-Z Plane

To create a trapezoidal profile in the Y-Z plane, follow these steps:

  1. Open a new sketch in Fusion 360.
  2. Click on the “Sketch” tab and select the “Trapezoid” tool from the 2D sketching tools.
  3. Draw a trapezoid by specifying the width and height of the profile.
  4. The resulting trapezoid will be a profile with a height and width, but no depth.

Practical Applications

Understanding the differences between the X-Y, X-Z, and Y-Z planes is crucial for creating accurate and efficient sketches in Fusion 360. Here are some practical applications of each plane:

  • The X-Y plane is ideal for creating flat profiles, such as a rectangular plate or a flat sheet metal part.
  • The X-Z plane is ideal for creating profiles with a depth, such as a cylindrical shape or a conical shape.
  • The Y-Z plane is ideal for creating profiles with a height, such as a column or a beam.

Conclusion

In conclusion, understanding the differences between the X-Y, X-Z, and Y-Z planes is essential for creating accurate and efficient sketches in Fusion 360. By mastering the use of these planes, you can create a wide range of profiles and shapes that are critical for creating 3D models and assemblies. With practice and patience, you can become proficient in sketching in Fusion 360 and unlock the full potential of this powerful CAD software.

FAQ

Q: What is the default plane in Fusion 360?

A: The X-Y plane is the default plane in Fusion 360.

Q: How do I create a profile in the X-Z plane?

A: To create a profile in the X-Z plane, select the “Sketch” tab and choose the “Plane” tool from the 2D sketching tools. Then, select the X-Z plane as the active plane and begin sketching.

Q: What is the difference between a profile and a sketch?

A: A profile is a 2D sketch that represents the shape of a part or an assembly. A sketch is the underlying geometry that makes up a profile.

Q: How do I switch between planes in Fusion 360?

A: To switch between planes in Fusion 360, select the “Sketch” tab and choose the “Plane” tool from the 2D sketching tools. Then, select the desired plane as the active plane.

Q: Can I create a profile in multiple planes at once?

A: Yes, you can create a profile in multiple planes at once by using the “Plane Merge” tool. This tool allows you to merge multiple planes into a single profile.

Q: What is the significance of the X-Y, X-Z, and Y-Z planes in Fusion 360?

A: The X-Y, X-Z, and Y-Z planes are the fundamental planes in Fusion 360 that serve as the foundation for sketching. Understanding the differences between these planes is crucial for creating accurate and efficient sketches.


End of Blog


Fusion 360 Workbook Cover

After purchasing, a download link will be sent instantly to your email.

Buy Now For $27.99

Are you a student or Unemployed? Get this bundle for $19.99

Offer for Students Buy Now For $19.99

Buy Paperback on Amazon.com

Autodesk Fusion 360 All-in-One Workbook

500+ Practice Exercises to Master Autodesk Fusion 360 through real-world practice!

This all-in-one workbook is your ultimate resource to develop hands-on CAD skills with Autodesk Fusion 360. Whether you’re a student, engineer, hobbyist, or professional, this guide is built to help you gain real design confidence through structured practice.

What’s Inside this Book:

  • 200 2D Sketching Exercises – Build a strong foundation in dimension-driven 2D geometry and technical drawings
  • 200 3D Modeling Exercises – Practice modeling real-world parts, from simple shapes to complex components.
  • Multi-Part Assembly Projects – Understand how parts fit together and create full assemblies with detailed drawings

🎯 Why This Book?

  • 500+ practice exercises following real design standards
  • Designed for self-paced learning & independent practice
  • Perfect for classrooms, technical interview preparation, and personal projects
  • Covers 2D Sketching, 3D Modeling & Assembly Design in one workbook
  • Trusted by 15,000+ CAD learners worldwide

After purchasing, a download link will be sent instantly to your email.

Buy Now For $27.99

Are you a student or Unemployed? Get this bundle for $19.99

Offer for Students Buy Now For $19.99

Buy Paperback on Amazon.com

Unlock Perfect Designs: Choosing the Right Plane in Fusion 360

Unlock Perfect Designs: Choosing the Right Plane in Fusion 360

Introduction

When it comes to sketching in Fusion 360, choosing the right plane is a crucial step that can make a significant difference in the quality and accuracy of your design. Fusion 360 offers a variety of planes to choose from, each with its own unique characteristics and use cases. In this blog post, we will explore the different types of planes available in Fusion 360, their advantages and disadvantages, and provide practical examples to help you choose the right plane for your sketching needs.

Understanding Planes in Fusion 360

Before we dive into the different types of planes, it’s essential to understand the basics of planes in Fusion 360. A plane in Fusion 360 is a 2D surface that can be used as a reference for sketching, extrusions, and other operations. Planes can be created from existing faces, other planes, or from scratch using the plane tool.

Creating a New Plane

To create a new plane in Fusion 360, follow these steps:

  1. Open a new or existing part file in Fusion 360.
  2. Go to the “Create” tab in the top menu bar.
  3. Click on the “Plane” button in the “Surface” group.
  4. Select the type of plane you want to create (more on this below).
  5. Specify the plane’s properties, such as its origin, orientation, and units.

Types of Planes in Fusion 360

Fusion 360 offers several types of planes, each with its own strengths and weaknesses. The main types of planes are:

1. Body Planes

Body planes are created from the body of a part and are used to sketch and extrude features that are aligned with the part’s geometry. Body planes are excellent for creating features that are symmetrical or have a specific orientation.

2. Face Planes

Face planes are created from existing faces and are used to sketch and extrude features that are perpendicular to the face. Face planes are useful for creating features that are parallel to a specific face or have a specific orientation.

3. Plane Planes

Plane planes are created from scratch using the plane tool and are used to sketch and extrude features that are not aligned with the part’s geometry. Plane planes are excellent for creating features that are offset from the part’s geometry or have a specific orientation.

4. XY Plane

The XY plane is a special type of plane that is aligned with the origin of the part and is used as a reference for sketching and extrusions. The XY plane is excellent for creating features that are symmetrical or have a specific orientation.

5. Z Plane

The Z plane is a special type of plane that is perpendicular to the XY plane and is used as a reference for sketching and extrusions. The Z plane is excellent for creating features that are aligned with the part’s geometry.

Choosing the Right Plane

Choosing the right plane for your sketching needs depends on several factors, including the part’s geometry, the feature’s orientation, and the desired outcome. Here are some practical examples to help you choose the right plane:

Example 1: Sketching a Symmetrical Feature

If you want to sketch a symmetrical feature, use a body plane or the XY plane as a reference. Body planes are excellent for creating features that are symmetrical or have a specific orientation.

Example 2: Sketching a Feature Perpendicular to a Face

If you want to sketch a feature that is perpendicular to a face, use a face plane as a reference. Face planes are useful for creating features that are parallel to a specific face or have a specific orientation.

Example 3: Sketching a Feature Offset from the Part’s Geometry

If you want to sketch a feature that is offset from the part’s geometry, use a plane plane as a reference. Plane planes are excellent for creating features that are not aligned with the part’s geometry or have a specific orientation.

Best Practices for Working with Planes

Here are some best practices to keep in mind when working with planes in Fusion 360:

1. Use the Right Plane for the Job

Make sure to use the right plane for the job, based on the part’s geometry, the feature’s orientation, and the desired outcome.

2. Use the XY Plane as a Reference

Use the XY plane as a reference for sketching and extrusions, especially when creating symmetrical features.

3. Use Face Planes to Perpendicular Features

Use face planes to create features that are perpendicular to a specific face or have a specific orientation.

4. Use Plane Planes for Offset Features

Use plane planes to create features that are not aligned with the part’s geometry or have a specific orientation.

Conclusion

Choosing the right plane for sketching in Fusion 360 is a crucial step that can make a significant difference in the quality and accuracy of your design. By understanding the different types of planes available in Fusion 360, their advantages and disadvantages, and following best practices, you can ensure that your designs are accurate, efficient, and effective.

FAQ

What is the difference between a body plane and a face plane?

A body plane is created from the body of a part and is used to sketch and extrude features that are aligned with the part’s geometry. A face plane is created from an existing face and is used to sketch and extrude features that are perpendicular to the face.

How do I create a new plane in Fusion 360?

To create a new plane in Fusion 360, go to the “Create” tab, click on the “Plane” button, select the type of plane you want to create, and specify its properties.

What is the XY plane used for?

The XY plane is used as a reference for sketching and extrusions, especially when creating symmetrical features. It is aligned with the origin of the part and is an excellent reference for features that require a specific orientation.

Can I use a plane plane to create a feature that is aligned with the part’s geometry?

Yes, you can use a plane plane to create a feature that is aligned with the part’s geometry. However, it’s generally more efficient and accurate to use a body plane or the XY plane as a reference.

How do I know which plane to use for a specific feature?

The choice of plane depends on the part’s geometry, the feature’s orientation, and the desired outcome. Use the examples and best practices provided above to help you choose the right plane for your sketching needs.

Can I delete a plane in Fusion 360?

Yes, you can delete a plane in Fusion 360 by selecting it and pressing the Delete key. However, be aware that deleting a plane may affect the accuracy and integrity of your design.


End of Blog


Fusion 360 Workbook Cover

After purchasing, a download link will be sent instantly to your email.

Buy Now For $27.99

Are you a student or Unemployed? Get this bundle for $19.99

Offer for Students Buy Now For $19.99

Buy Paperback on Amazon.com

Autodesk Fusion 360 All-in-One Workbook

500+ Practice Exercises to Master Autodesk Fusion 360 through real-world practice!

This all-in-one workbook is your ultimate resource to develop hands-on CAD skills with Autodesk Fusion 360. Whether you’re a student, engineer, hobbyist, or professional, this guide is built to help you gain real design confidence through structured practice.

What’s Inside this Book:

  • 200 2D Sketching Exercises – Build a strong foundation in dimension-driven 2D geometry and technical drawings
  • 200 3D Modeling Exercises – Practice modeling real-world parts, from simple shapes to complex components.
  • Multi-Part Assembly Projects – Understand how parts fit together and create full assemblies with detailed drawings

🎯 Why This Book?

  • 500+ practice exercises following real design standards
  • Designed for self-paced learning & independent practice
  • Perfect for classrooms, technical interview preparation, and personal projects
  • Covers 2D Sketching, 3D Modeling & Assembly Design in one workbook
  • Trusted by 15,000+ CAD learners worldwide

After purchasing, a download link will be sent instantly to your email.

Buy Now For $27.99

Are you a student or Unemployed? Get this bundle for $19.99

Offer for Students Buy Now For $19.99

Buy Paperback on Amazon.com

Unlock Perfect Designs: Choosing the Right Plane in Fusion 360

Unlock Perfect Designs: Choosing the Right Plane in Fusion 360

Introduction

When it comes to sketching in Fusion 360, choosing the right plane is a crucial step that can make a significant difference in the quality and accuracy of your design. Fusion 360 offers a variety of planes to choose from, each with its own unique characteristics and use cases. In this blog post, we will explore the different types of planes available in Fusion 360, their advantages and disadvantages, and provide practical examples to help you choose the right plane for your sketching needs.

Understanding Planes in Fusion 360

Before we dive into the different types of planes, it’s essential to understand the basics of planes in Fusion 360. A plane in Fusion 360 is a 2D surface that can be used as a reference for sketching, extrusions, and other operations. Planes can be created from existing faces, other planes, or from scratch using the plane tool.

Creating a New Plane

To create a new plane in Fusion 360, follow these steps:

  1. Open a new or existing part file in Fusion 360.
  2. Go to the “Create” tab in the top menu bar.
  3. Click on the “Plane” button in the “Surface” group.
  4. Select the type of plane you want to create (more on this below).
  5. Specify the plane’s properties, such as its origin, orientation, and units.

Types of Planes in Fusion 360

Fusion 360 offers several types of planes, each with its own strengths and weaknesses. The main types of planes are:

1. Body Planes

Body planes are created from the body of a part and are used to sketch and extrude features that are aligned with the part’s geometry. Body planes are excellent for creating features that are symmetrical or have a specific orientation.

2. Face Planes

Face planes are created from existing faces and are used to sketch and extrude features that are perpendicular to the face. Face planes are useful for creating features that are parallel to a specific face or have a specific orientation.

3. Plane Planes

Plane planes are created from scratch using the plane tool and are used to sketch and extrude features that are not aligned with the part’s geometry. Plane planes are excellent for creating features that are offset from the part’s geometry or have a specific orientation.

4. XY Plane

The XY plane is a special type of plane that is aligned with the origin of the part and is used as a reference for sketching and extrusions. The XY plane is excellent for creating features that are symmetrical or have a specific orientation.

5. Z Plane

The Z plane is a special type of plane that is perpendicular to the XY plane and is used as a reference for sketching and extrusions. The Z plane is excellent for creating features that are aligned with the part’s geometry.

Choosing the Right Plane

Choosing the right plane for your sketching needs depends on several factors, including the part’s geometry, the feature’s orientation, and the desired outcome. Here are some practical examples to help you choose the right plane:

Example 1: Sketching a Symmetrical Feature

If you want to sketch a symmetrical feature, use a body plane or the XY plane as a reference. Body planes are excellent for creating features that are symmetrical or have a specific orientation.

Example 2: Sketching a Feature Perpendicular to a Face

If you want to sketch a feature that is perpendicular to a face, use a face plane as a reference. Face planes are useful for creating features that are parallel to a specific face or have a specific orientation.

Example 3: Sketching a Feature Offset from the Part’s Geometry

If you want to sketch a feature that is offset from the part’s geometry, use a plane plane as a reference. Plane planes are excellent for creating features that are not aligned with the part’s geometry or have a specific orientation.

Best Practices for Working with Planes

Here are some best practices to keep in mind when working with planes in Fusion 360:

1. Use the Right Plane for the Job

Make sure to use the right plane for the job, based on the part’s geometry, the feature’s orientation, and the desired outcome.

2. Use the XY Plane as a Reference

Use the XY plane as a reference for sketching and extrusions, especially when creating symmetrical features.

3. Use Face Planes to Perpendicular Features

Use face planes to create features that are perpendicular to a specific face or have a specific orientation.

4. Use Plane Planes for Offset Features

Use plane planes to create features that are not aligned with the part’s geometry or have a specific orientation.

Conclusion

Choosing the right plane for sketching in Fusion 360 is a crucial step that can make a significant difference in the quality and accuracy of your design. By understanding the different types of planes available in Fusion 360, their advantages and disadvantages, and following best practices, you can ensure that your designs are accurate, efficient, and effective.

FAQ

What is the difference between a body plane and a face plane?

A body plane is created from the body of a part and is used to sketch and extrude features that are aligned with the part’s geometry. A face plane is created from an existing face and is used to sketch and extrude features that are perpendicular to the face.

How do I create a new plane in Fusion 360?

To create a new plane in Fusion 360, go to the “Create” tab, click on the “Plane” button, select the type of plane you want to create, and specify its properties.

What is the XY plane used for?

The XY plane is used as a reference for sketching and extrusions, especially when creating symmetrical features. It is aligned with the origin of the part and is an excellent reference for features that require a specific orientation.

Can I use a plane plane to create a feature that is aligned with the part’s geometry?

Yes, you can use a plane plane to create a feature that is aligned with the part’s geometry. However, it’s generally more efficient and accurate to use a body plane or the XY plane as a reference.

How do I know which plane to use for a specific feature?

The choice of plane depends on the part’s geometry, the feature’s orientation, and the desired outcome. Use the examples and best practices provided above to help you choose the right plane for your sketching needs.

Can I delete a plane in Fusion 360?

Yes, you can delete a plane in Fusion 360 by selecting it and pressing the Delete key. However, be aware that deleting a plane may affect the accuracy and integrity of your design.


End of Blog


Fusion 360 Workbook Cover

After purchasing, a download link will be sent instantly to your email.

Buy Now For $27.99

Are you a student or Unemployed? Get this bundle for $19.99

Offer for Students Buy Now For $19.99

Buy Paperback on Amazon.com

Autodesk Fusion 360 All-in-One Workbook

500+ Practice Exercises to Master Autodesk Fusion 360 through real-world practice!

This all-in-one workbook is your ultimate resource to develop hands-on CAD skills with Autodesk Fusion 360. Whether you’re a student, engineer, hobbyist, or professional, this guide is built to help you gain real design confidence through structured practice.

What’s Inside this Book:

  • 200 2D Sketching Exercises – Build a strong foundation in dimension-driven 2D geometry and technical drawings
  • 200 3D Modeling Exercises – Practice modeling real-world parts, from simple shapes to complex components.
  • Multi-Part Assembly Projects – Understand how parts fit together and create full assemblies with detailed drawings

🎯 Why This Book?

  • 500+ practice exercises following real design standards
  • Designed for self-paced learning & independent practice
  • Perfect for classrooms, technical interview preparation, and personal projects
  • Covers 2D Sketching, 3D Modeling & Assembly Design in one workbook
  • Trusted by 15,000+ CAD learners worldwide

After purchasing, a download link will be sent instantly to your email.

Buy Now For $27.99

Are you a student or Unemployed? Get this bundle for $19.99

Offer for Students Buy Now For $19.99

Buy Paperback on Amazon.com

Master Fusion 360: Unlock Sketch Mode with Expert Tips

Master Fusion 360: Unlock Sketch Mode with Expert Tips

Introduction

Entering Sketch Mode in Fusion 360 is a fundamental skill for users of this powerful 3D CAD software. As a beginner, navigating the interface and understanding how to create and work with sketches can be overwhelming. In this comprehensive guide, we’ll walk you through the process of entering Sketch Mode, highlighting the key steps and best practices for creating accurate and efficient sketches.

Preparing for Sketch Mode

Before entering Sketch Mode, it’s essential to understand the fundamental concepts of Fusion 360 and its interface. Familiarize yourself with the user interface, including the toolbar, menus, and workspace. Make sure you have a clear understanding of the different modes in Fusion 360, such as Part, Assembly, and Sketch Mode.

Creating a New Sketch

To enter Sketch Mode, you need to create a new sketch. You can do this by going to the Create tab in the toolbar and selecting Sketch. Alternatively, you can use the Sketch tool in the Part tab. When creating a new sketch, you can choose from various sketch planes, such as the XY Plane, XZ Plane, or YZ Plane. You can also create a custom sketch plane by selecting the Create Plane tool.

Selecting a Sketch Plane

When selecting a sketch plane, consider the orientation and position of the plane relative to your part or assembly. For example, if you’re creating a part with a cylindrical shape, it’s best to create a sketch on the XY Plane. To select a sketch plane, click on the desired plane in the browser or use the Plane tool in the Sketch tab.

Understanding Sketch Entities

In Sketch Mode, you’ll work with various entities, including lines, curves, arcs, and splines. These entities are the building blocks of your sketch, and understanding how to create and manipulate them is crucial for creating accurate and efficient sketches. In the next section, we’ll delve deeper into the world of sketch entities.

Working with Sketch Entities

Sketch entities are the foundation of any sketch in Fusion 360. Understanding how to create and manipulate these entities is essential for creating accurate and efficient sketches.

Creating Lines and Curves

Lines and curves are the most basic sketch entities. You can create lines and curves using the Line and Curve tools in the Sketch tab. To create a line, select the Line tool and click on two points in the sketch plane. To create a curve, select the Curve tool and click on multiple points in the sketch plane.

Working with Arcs and Splines

Arcs and splines are more advanced sketch entities that can be used to create complex shapes. You can create arcs using the Arc tool in the Sketch tab. To create an arc, select the Arc tool and click on two points in the sketch plane. Splines are created using the Spline tool. To create a spline, select the Spline tool and click on multiple points in the sketch plane.

Understanding Constraints and Dimensions

Constraints and dimensions are essential for creating accurate and efficient sketches. Constraints define the relationships between sketch entities, while dimensions define the size and shape of the entities. In the next section, we’ll explore the world of constraints and dimensions.

Understanding Constraints and Dimensions

Constraints and dimensions are crucial for creating accurate and efficient sketches. Understanding how to apply constraints and dimensions is essential for achieving the desired shape and size of your part or assembly.

Applying Constraints

Constraints define the relationships between sketch entities. You can apply various constraints, including Coincidence, Perpendicular, and Tangent. To apply a constraint, select two or more sketch entities and click on the desired constraint in the Constraints panel.

Understanding Dimensions

Dimensions define the size and shape of sketch entities. You can add various dimensions, including Length, Width, and Angle. To add a dimension, select a sketch entity and click on the desired dimension in the Dimensions panel.

Understanding Assembly Constraints

Assembly constraints define the relationships between parts in an assembly. You can apply various assembly constraints, including Mate and Joint. To apply an assembly constraint, select two or more parts in the assembly and click on the desired constraint in the Constraints panel.

Conclusion

Entering Sketch Mode in Fusion 360 is a fundamental skill for users of this powerful 3D CAD software. By following the steps outlined in this comprehensive guide, you’ll be able to create accurate and efficient sketches with ease. Remember to always practice and experiment with different sketch entities, constraints, and dimensions to master the art of sketching in Fusion 360.

FAQ

Q: What is Sketch Mode in Fusion 360?

A: Sketch Mode is a fundamental mode in Fusion 360 where you can create and work with sketches. Sketches are two-dimensional representations of a part or assembly.

Q: How do I enter Sketch Mode in Fusion 360?

A: To enter Sketch Mode, go to the Create tab in the toolbar and select Sketch. Alternatively, you can use the Sketch tool in the Part tab.

Q: What are sketch entities?

A: Sketch entities are the building blocks of a sketch in Fusion 360. They include lines, curves, arcs, and splines.

Q: How do I create a new sketch in Fusion 360?

A: To create a new sketch, go to the Create tab in the toolbar and select Sketch. Alternatively, you can use the Sketch tool in the Part tab.

Q: What are constraints in Fusion 360?

A: Constraints define the relationships between sketch entities. You can apply various constraints, including Coincidence, Perpendicular, and Tangent.

Q: What are dimensions in Fusion 360?

A: Dimensions define the size and shape of sketch entities. You can add various dimensions, including Length, Width, and Angle.

Q: How do I save a sketch in Fusion 360?

A: To save a sketch, go to the File menu and select Save. You can also use the Ctrl+S shortcut to save the sketch.


End of Blog


Fusion 360 Workbook Cover

After purchasing, a download link will be sent instantly to your email.

Buy Now For $27.99

Are you a student or Unemployed? Get this bundle for $19.99

Offer for Students Buy Now For $19.99

Buy Paperback on Amazon.com

Autodesk Fusion 360 All-in-One Workbook

500+ Practice Exercises to Master Autodesk Fusion 360 through real-world practice!

This all-in-one workbook is your ultimate resource to develop hands-on CAD skills with Autodesk Fusion 360. Whether you’re a student, engineer, hobbyist, or professional, this guide is built to help you gain real design confidence through structured practice.

What’s Inside this Book:

  • 200 2D Sketching Exercises – Build a strong foundation in dimension-driven 2D geometry and technical drawings
  • 200 3D Modeling Exercises – Practice modeling real-world parts, from simple shapes to complex components.
  • Multi-Part Assembly Projects – Understand how parts fit together and create full assemblies with detailed drawings

🎯 Why This Book?

  • 500+ practice exercises following real design standards
  • Designed for self-paced learning & independent practice
  • Perfect for classrooms, technical interview preparation, and personal projects
  • Covers 2D Sketching, 3D Modeling & Assembly Design in one workbook
  • Trusted by 15,000+ CAD learners worldwide
After purchasing, a download link will be sent instantly to your email.

Buy Now For $27.99

Are you a student or Unemployed? Get this bundle for $19.99

Offer for Students Buy Now For $19.99

Buy Paperback on Amazon.com

Master Fusion 360: Unlock Sketch Mode with Expert Tips

Master Fusion 360: Unlock Sketch Mode with Expert Tips

Introduction

Entering Sketch Mode in Fusion 360 is a fundamental skill for users of this powerful 3D CAD software. As a beginner, navigating the interface and understanding how to create and work with sketches can be overwhelming. In this comprehensive guide, we’ll walk you through the process of entering Sketch Mode, highlighting the key steps and best practices for creating accurate and efficient sketches.

Preparing for Sketch Mode

Before entering Sketch Mode, it’s essential to understand the fundamental concepts of Fusion 360 and its interface. Familiarize yourself with the user interface, including the toolbar, menus, and workspace. Make sure you have a clear understanding of the different modes in Fusion 360, such as Part, Assembly, and Sketch Mode.

Creating a New Sketch

To enter Sketch Mode, you need to create a new sketch. You can do this by going to the Create tab in the toolbar and selecting Sketch. Alternatively, you can use the Sketch tool in the Part tab. When creating a new sketch, you can choose from various sketch planes, such as the XY Plane, XZ Plane, or YZ Plane. You can also create a custom sketch plane by selecting the Create Plane tool.

Selecting a Sketch Plane

When selecting a sketch plane, consider the orientation and position of the plane relative to your part or assembly. For example, if you’re creating a part with a cylindrical shape, it’s best to create a sketch on the XY Plane. To select a sketch plane, click on the desired plane in the browser or use the Plane tool in the Sketch tab.

Understanding Sketch Entities

In Sketch Mode, you’ll work with various entities, including lines, curves, arcs, and splines. These entities are the building blocks of your sketch, and understanding how to create and manipulate them is crucial for creating accurate and efficient sketches. In the next section, we’ll delve deeper into the world of sketch entities.

Working with Sketch Entities

Sketch entities are the foundation of any sketch in Fusion 360. Understanding how to create and manipulate these entities is essential for creating accurate and efficient sketches.

Creating Lines and Curves

Lines and curves are the most basic sketch entities. You can create lines and curves using the Line and Curve tools in the Sketch tab. To create a line, select the Line tool and click on two points in the sketch plane. To create a curve, select the Curve tool and click on multiple points in the sketch plane.

Working with Arcs and Splines

Arcs and splines are more advanced sketch entities that can be used to create complex shapes. You can create arcs using the Arc tool in the Sketch tab. To create an arc, select the Arc tool and click on two points in the sketch plane. Splines are created using the Spline tool. To create a spline, select the Spline tool and click on multiple points in the sketch plane.

Understanding Constraints and Dimensions

Constraints and dimensions are essential for creating accurate and efficient sketches. Constraints define the relationships between sketch entities, while dimensions define the size and shape of the entities. In the next section, we’ll explore the world of constraints and dimensions.

Understanding Constraints and Dimensions

Constraints and dimensions are crucial for creating accurate and efficient sketches. Understanding how to apply constraints and dimensions is essential for achieving the desired shape and size of your part or assembly.

Applying Constraints

Constraints define the relationships between sketch entities. You can apply various constraints, including Coincidence, Perpendicular, and Tangent. To apply a constraint, select two or more sketch entities and click on the desired constraint in the Constraints panel.

Understanding Dimensions

Dimensions define the size and shape of sketch entities. You can add various dimensions, including Length, Width, and Angle. To add a dimension, select a sketch entity and click on the desired dimension in the Dimensions panel.

Understanding Assembly Constraints

Assembly constraints define the relationships between parts in an assembly. You can apply various assembly constraints, including Mate and Joint. To apply an assembly constraint, select two or more parts in the assembly and click on the desired constraint in the Constraints panel.

Conclusion

Entering Sketch Mode in Fusion 360 is a fundamental skill for users of this powerful 3D CAD software. By following the steps outlined in this comprehensive guide, you’ll be able to create accurate and efficient sketches with ease. Remember to always practice and experiment with different sketch entities, constraints, and dimensions to master the art of sketching in Fusion 360.

FAQ

Q: What is Sketch Mode in Fusion 360?

A: Sketch Mode is a fundamental mode in Fusion 360 where you can create and work with sketches. Sketches are two-dimensional representations of a part or assembly.

Q: How do I enter Sketch Mode in Fusion 360?

A: To enter Sketch Mode, go to the Create tab in the toolbar and select Sketch. Alternatively, you can use the Sketch tool in the Part tab.

Q: What are sketch entities?

A: Sketch entities are the building blocks of a sketch in Fusion 360. They include lines, curves, arcs, and splines.

Q: How do I create a new sketch in Fusion 360?

A: To create a new sketch, go to the Create tab in the toolbar and select Sketch. Alternatively, you can use the Sketch tool in the Part tab.

Q: What are constraints in Fusion 360?

A: Constraints define the relationships between sketch entities. You can apply various constraints, including Coincidence, Perpendicular, and Tangent.

Q: What are dimensions in Fusion 360?

A: Dimensions define the size and shape of sketch entities. You can add various dimensions, including Length, Width, and Angle.

Q: How do I save a sketch in Fusion 360?

A: To save a sketch, go to the File menu and select Save. You can also use the Ctrl+S shortcut to save the sketch.


End of Blog


Fusion 360 Workbook Cover

After purchasing, a download link will be sent instantly to your email.

Buy Now For $27.99

Are you a student or Unemployed? Get this bundle for $19.99

Offer for Students Buy Now For $19.99

Buy Paperback on Amazon.com

Autodesk Fusion 360 All-in-One Workbook

500+ Practice Exercises to Master Autodesk Fusion 360 through real-world practice!

This all-in-one workbook is your ultimate resource to develop hands-on CAD skills with Autodesk Fusion 360. Whether you’re a student, engineer, hobbyist, or professional, this guide is built to help you gain real design confidence through structured practice.

What’s Inside this Book:

  • 200 2D Sketching Exercises – Build a strong foundation in dimension-driven 2D geometry and technical drawings
  • 200 3D Modeling Exercises – Practice modeling real-world parts, from simple shapes to complex components.
  • Multi-Part Assembly Projects – Understand how parts fit together and create full assemblies with detailed drawings

🎯 Why This Book?

  • 500+ practice exercises following real design standards
  • Designed for self-paced learning & independent practice
  • Perfect for classrooms, technical interview preparation, and personal projects
  • Covers 2D Sketching, 3D Modeling & Assembly Design in one workbook
  • Trusted by 15,000+ CAD learners worldwide

After purchasing, a download link will be sent instantly to your email.

Buy Now For $27.99

Are you a student or Unemployed? Get this bundle for $19.99

Offer for Students Buy Now For $19.99

Buy Paperback on Amazon.com

Optimize Your Workflow: Mastering Sketch Workspace in Fusion 360

Optimize Your Workflow: Mastering Sketch Workspace in Fusion 360

Introduction

Getting started with Fusion 360 can be a daunting task, especially for beginners. The software offers a vast array of features and tools that can be overwhelming if you don’t know where to start. Understanding the sketch workspace is crucial to unlocking the full potential of Fusion 360. In this post, we’ll take a step-by-step approach to understanding the sketch workspace and how to effectively use it in Fusion 360.

The Basics of the Sketch Workspace

The sketch workspace is where you create 2D sketches, which are the foundation of your 3D models. To access the sketch workspace, click on the “Create Sketch” button in the toolbar or press the “S” key. When you enter the sketch workspace, you’ll notice a blank canvas with a grid and some basic tools.

Understanding the Grid

The grid is a critical component of the sketch workspace. It helps you create precise and accurate sketches by providing a reference point for your measurements. You can adjust the grid settings by going to “Tools” > “Options” > “Grid and Snap” and customizing the grid size, spacing, and other settings.

Familiarizing Yourself with the Tools

The sketch workspace comes equipped with a range of tools that you’ll use to create your sketches. Some of the basic tools include:

  • Rectangle tool: Creates a rectangle by dragging the mouse or using the keyboard shortcuts.
  • Circle tool: Creates a circle by clicking and dragging the mouse or using the keyboard shortcuts.
  • Line tool: Creates a line by clicking and dragging the mouse or using the keyboard shortcuts.
  • Arc tool: Creates an arc by clicking and dragging the mouse or using the keyboard shortcuts.

Understanding Sketch Entities

Sketch entities are the individual components that make up your sketch. They can include lines, curves, arcs, circles, and rectangles. Each entity has its own set of properties and behaviors that you can customize using the “Sketch Entities” panel.

Working with Constraints

Constraints are used to define the relationships between sketch entities. They help maintain the integrity of your sketch by ensuring that the entities are correctly related. There are several types of constraints available, including:

  • Coincident: Ensures that two entities coincide at a point.
  • Collinear: Ensures that two entities are collinear (lie on the same line).
  • Perpendicular: Ensures that two entities are perpendicular to each other.
  • Equal: Ensures that two entities have equal lengths.

Advanced Sketch Techniques

Once you’ve mastered the basics of the sketch workspace, it’s time to explore some advanced techniques. These techniques will help you create more complex sketches and take your Fusion 360 skills to the next level.

Using Dimensions and Tolerancing

Dimensions and tolerancing are critical components of any sketch. They help define the size and shape of your sketch entities. You can add dimensions and tolerancing using the “Dimensions” panel or by using keyboard shortcuts.

Working with Curves and Splines

Curves and splines are used to create smooth, flowing shapes in your sketches. You can create curves and splines using the “Curve” tool or by using the “Spline” tool.

Understanding Sketch Planes

Sketch planes are used to define the coordinate system for your sketch. You can create sketch planes using the “Plane” tool or by using the “Sketch Plane” panel.

Best Practices for the Sketch Workspace

To get the most out of the sketch workspace, follow these best practices:

  • Use the grid: The grid is your friend when it comes to creating accurate sketches. Make sure to use it to ensure that your sketch entities are precisely aligned.
  • Use constraints: Constraints help maintain the integrity of your sketch by defining the relationships between entities. Use them to ensure that your sketch is correct.
  • Use dimensions and tolerancing: Dimensions and tolerancing are critical components of any sketch. Use them to define the size and shape of your sketch entities.
  • Experiment and practice: The sketch workspace is a powerful tool, but it takes practice to master. Don’t be afraid to experiment and try new things.

Conclusion

The sketch workspace is a critical component of Fusion 360, and understanding it is essential to creating accurate and precise 3D models. By following the tips and techniques outlined in this post, you’ll be well on your way to mastering the sketch workspace and unlocking the full potential of Fusion 360.

FAQ

Q: What is the purpose of the grid in the sketch workspace?

A: The grid is used to create precise and accurate sketches by providing a reference point for your measurements.

Q: How do I create a sketch in Fusion 360?

A: To create a sketch, click on the “Create Sketch” button in the toolbar or press the “S” key.

Q: What are constraints in the sketch workspace?

A: Constraints are used to define the relationships between sketch entities. They help maintain the integrity of your sketch by ensuring that the entities are correctly related.

Q: How do I add dimensions and tolerancing to my sketch?

A: You can add dimensions and tolerancing using the “Dimensions” panel or by using keyboard shortcuts.

Q: What is the difference between a curve and a spline?

A: A curve is a smooth, flowing shape, while a spline is a type of curve that is used to create complex shapes.

Q: How do I create a sketch plane in Fusion 360?

A: You can create a sketch plane using the “Plane” tool or by using the “Sketch Plane” panel.

Q: What is the best way to learn the sketch workspace in Fusion 360?

A: The best way to learn the sketch workspace is by experimenting and practicing. Try creating simple sketches and gradually move on to more complex ones.


End of Blog


Fusion 360 Workbook Cover

After purchasing, a download link will be sent instantly to your email.

Buy Now For $27.99

Are you a student or Unemployed? Get this bundle for $19.99

Offer for Students Buy Now For $19.99

Buy Paperback on Amazon.com

Autodesk Fusion 360 All-in-One Workbook

500+ Practice Exercises to Master Autodesk Fusion 360 through real-world practice!

This all-in-one workbook is your ultimate resource to develop hands-on CAD skills with Autodesk Fusion 360. Whether you’re a student, engineer, hobbyist, or professional, this guide is built to help you gain real design confidence through structured practice.

What’s Inside this Book:

  • 200 2D Sketching Exercises – Build a strong foundation in dimension-driven 2D geometry and technical drawings
  • 200 3D Modeling Exercises – Practice modeling real-world parts, from simple shapes to complex components.
  • Multi-Part Assembly Projects – Understand how parts fit together and create full assemblies with detailed drawings

🎯 Why This Book?

  • 500+ practice exercises following real design standards
  • Designed for self-paced learning & independent practice
  • Perfect for classrooms, technical interview preparation, and personal projects
  • Covers 2D Sketching, 3D Modeling & Assembly Design in one workbook
  • Trusted by 15,000+ CAD learners worldwide

After purchasing, a download link will be sent instantly to your email.

Buy Now For $27.99

Are you a student or Unemployed? Get this bundle for $19.99

Offer for Students Buy Now For $19.99

Buy Paperback on Amazon.com